Friday, November 30, 2007

Monogrammed Ornaments

I made a "J" and an "M" for our tree to be - Sunday is the day and I can't wait! I used vintage fabric that I bought a while ago from a market and filled each one with 100% natural cotton filling.


The "J" came out much better than the "M"

After making our initials I got addicted and started making random letters.


Work in progress

I was thinking about posting some for sale next week ($5-$8 each depending on fabric and embellishment). I won't have every single alphabet, so if you want a specific letter - feel free to email me and I'll see what I can do. So far, I have M, E, S, and J. I'm having some issues with the A's but I'm hoping to sort that out.

Signing off for the day... have a great weekend - speak to you on Monday.

Thursday, November 29, 2007

Holiday Shopping Discount Codes

I've trained myself to hunt down promocodes when ordering online, usually I find free shipping or 10% off my order.

I personally haven't tried any of these online promo codes yet but the list looks impressive (sephora, armani exchange, banana rep and in-store coupons as well) - happy shopping!!

How to: Retail Pricing


Here are more articles that I've come across during my research. Great reads on setting up prices in a retail environment.

Pricing and Small Retailers: Questions to Consider (6-Part Series)
"In this article, we begin with several questions for you to consider. When you address these questions for your firm, always ask yourself the rationable behind your answers: 1-Do you have an overall pricing philosophy? What is it? 2-What are the characteristics of the people who shop..." more

Start-up Nation
"Use informal focus groups, testing and even your own experiences as a consumer to figure out what might go through the minds of customers as they consider your prices. There’s a sound psychological reason..." more

The Price is Right, or Is It? Determining the Impact of Price on Sales
"Fisher notes that people tend to separate pricing into markdown pricing and regular pricing. Much of the world’s economy is transacted in markdown pricing; indeed, department stores may sell more than half their volume at..." more

Perception Of Value
"It's a common fallacy that people buy based on price. Well some do, but most people buy based on value or rather their perception of value. Many small business owners begin their business life with the thought that they will enter their market and simply offer what they have at a slightly lower price and all will be good. In truth it's not the best or even a good idea. Unless your last name is Walton and you're an heir to the Wal-Mart throne..." more

Sources:
http://retailindustry.about.com/library/uc/be/uc_be_pricing1.htm
http://www.startupnation.com/articles/1483/1/pricing-strategy-startup.asp
http://knowledge.wharton.upenn.edu/article.cfm?articleid=873
http://www.webpronews.com/blogtalk/2006/12/13/perception-of-value
Image from unadorned.org

Last Night's Dinner #67: Sausage, Spinach and Ricotta Tart


I've been concentrating on finishing a craft project so I haven't had much time or energy to research new recipes to try.

So last night, I opened my fridge and freezer to see what ingredients I had on hand - here's what I came up with...

Frozen spinach leaves + sweet Italian sausages (I froze half of the package from my Thanksgiving stuffing) + frozen puff pastry dough (thank you Trader Joe's!) + Ricotta + Parmesan cheese + fresh thyme and parsley = Sausage & Spinach Tarts


I sautéed the sausages (remove from casings) in olive oil, garlic and shallots. Seasoned with salt, pepper, herbs and hot pepper flakes. (Set aside)

Leaving the oil in the pan, I then sautéed the thawed spinach (first squeezing out as much liquid from the leaves), seasoned with salt, pepper and a dab of butter.

I decided to cut up the pastry puff into smallish rectangles.
Preheat oven to 400F degrees, brush dough with egg wash and bake for 10-15 minutes or until lightly brown. The pastry will not be completely done at this point. I didn't want the pastry to get soggy, that's why I pre-baked the dough before adding the toppings. I then layered on spinach, sausage, ricotta cheese then grated some parmesan cheese to top it off. Bake this for another 10-15 minutes or until the cheese starts to bubble.


Easy and tasty. This was a definite crowd (be it 2) pleaser!

Wednesday, November 28, 2007

He's Baaaack!


I came home exhausted from the gym last night, looking forward to a nice evening alone at home. Hillsy was out having drinks with a few co-workers - one of the guys visiting from London was heading back. Anyway, as soon as I step foot into the apartment my phone rings. It was Zandra calling to tell me a wacky story about a gym instructor who managed to electrocute himself on the sound system! Fifteen minutes into the conversation, I hear something going ballistic in back of the bookshelves. It didn't even care that I was in the same room, going ballistic myself on the phone with Zandra Oh my god Z, he's back and he's going freakin' mental back there! Let me call you back, I need to call for backup.

I managed to get a hold of Hillsy and poor guy had to run home. I didn't want my friend coming out from the sides so I managed to block both sides with a piece of ply wood and some books. It was still rustling around - very loudly.

Hillsy gets home and we come up with a plan.
Lower down a sticky pad and lure him towards it with a stick. Neither of us had the guts to just spear the thing to death! However, my friend manages to hide behind the 10 million wires back there and the plan fails. We then decide to pull up all of the wires so that we can get a better view. Once we cleared all of the wires, my friend pulls a David Copperfield and manages to escape (again!) There was a big enough gap on the right-hand side where the wires were, so we suspect it slid under. I'm just trying to figure out if it came from the same place and just got all confused or if there's a new entry point that we haven't closed up. Seriously, I'm so ready to move!


Our mouse hunting escapades ended with us pulling out the shelves and foaming up the gaps. Ahhh the saga continues. He's now my dead-beat son. Comes in whenever he pleases, eats and then leaves... !

I look forward to our next meeting my friend, maybe next time you won't be so lucky...

Last Night's Dinner #66: A lighter eggplant parmesan


Sometimes I find that chicken and eggplant parmesan can be a little too heavy. Although as you can tell from my nightly eats - I really don't have an issue with heaviness, but today I wanted to try making a lighter version of this classic.

This version doesn't require cups of oil - everything is done in the oven. I simply brushed both sides of the eggplant (cut into 1/2 " rounds) with olive oil and baked it at 450F degrees (10 minutes each side).


I then dipped each piece in egg and covered both sides with some leftover panko crumbs I had from the last time I made Karen's No-Fry Fried Chicken. I baked them for an additional 15 minutes (turning halfway through) until nice and crisp.

Once the eggplants are done, all you have to do is layer 3 to 4 pieces with tomato sauce (store bought or make the best basic tomato sauce recipe in the world) and top it with a liberal slice of fresh mozzarella and grate a bit of parmesan cheese on top!


Put it back in the oven and bake for 8 minutes or so until the cheese melts. Put it in the broiler if you want to brown the cheese a bit. Enjoy!

Tuesday, November 27, 2007

Disappointed with humanity

I've never met anyone more disciplined than my oldest brother Russell. Whether it's turning his lifestyle on a complete 180 and becoming a pastor, fascinating the Texans with his Aikido workouts at the local gym, or dedicating more than two years of his life writing his final dissertation (the final step to receiving a doctorate in theology) - anything he sets out to do is done with the utmost passion and dedication.

I just got off the phone with him, the poor guy is completely shattered...

His home was professionally burglarized yesterday and his MacBook was one of the targets, along with the back-up external hard drive. More than two years of his work gone in an instant. No hard copies, no emailed version, no notes. I can't even begin to imagine how it must feel to lose something that you've put so much heart into. Yes you can be thankful and hold on to the thought that at least no one got hurt, but I assume that the pain that comes along with losing something as personal as a dissertation that you've been working on for god knows how long just overcomes and overrides all. I've lost gloves, wallets even mp3 files and I'm guessing that the frustration I felt times 1000 is not even close to what my brother and his family are going through right now.

Unlike the rest of my family, I always question the existence of a higher being. Instances like this make me think that he might have had a day off.

Check out the Chucks...

I've been looking high and low for comfy everyday shoes and the hunt is finally over!!!

Introducing my new Converse Chuck Taylor® All Star® Shearling Ox sneakies... I ordered them from Zappos.com, who along with Piperlime.com and Endless.com have revolutionized online shoe shopping. I can't remember the last time I bought shoes from an actual store.


Comfy and toasty, I love them =)
I am a dork - I was prancing around the apartment all night with them on, because I was super excited to wear them.

Last Night's Dinner #65: Leftover Ham & Cheese Sandwich


Almost done with the ham! Easy dinner last night - sliced ham, grated cheddar cheese, whole grain mustard, and a dab of butter & mayo. I'm slowly trying to wean off the bad eating habits of last week, notice the side dish of sliced apples ;-)


I didn't want to bust out the panini press, so I used my grilling pan and used another pan as the press.

Monday, November 26, 2007

November check-up


Last month I decided to do monthly check ups, to sort of help me keep myself in check. I can't believe I actually remembered to do it this month, that in itself is an accomplishment.

Do I plan to sell the stuff I make?
Last week and the week before that I was really excited about the possibility of starting a craft-related business. This week, I'm not feeling as confident about it. I had a couple of ideas storming around in my head but then thoughts of "not good enough" began to infest my mind. I'm mostly frustrated with the fact that all of the things that I enjoy making seem to take a very long time to finish. Either I live with that fact and decide to make one off items at premium prices (which I don't think I'm particularly good enough to do) or come up with a better production process and compromise some of the designs. I haven't given up on the idea, but to be perfectly honest - I'm a little less hopeful about the whole thing this week.

It's insane, but I seem to be having schedule/timing issues with crafting. I have tons of ideas floating in my head and I'm having issues prioritizing. I really want to make Christmas ornaments for my own tree but that idea totally conflicts with the need to finish the calendar (one more month to go). You would think that I have all the time in the world, but the clock ticks at an insane pace when your mind is full of I want to make... ideas!

Am I any closer to owning my own shop?
I'm happy to report that this dream is still very much alive. There are so many shops both online and brick & mortar that inspire me on a daily basis. Hillsy and I have been discussing whether starting an online shop would be a better option at this stage.

Unfortunately the concept of the shop is still evolving. I'm slowly moving away from my original idea and hoping to do something closer to my heart.

Updates since last check-up:
I have filed for a DBA and waiting to see whether NYC approves it. I'm told that it should take approx 20 business days so I should know by end of the month. If I had to do it over again, I probably would've filed the DBA on my own rather than going through legalzoom.com.

Do I plan to look for a "traditional" job? still NO

Last Night's Dinner #64: A Traditional Filipino Breakfast


Leftover ham is the best and boy do we have plenty left from Thanksgiving night!

Bone-in ham immediately takes me back to my childhood years. I remember my father bringing home a huge ham wrapped in paper for the holidays. The best part for me was knowing exactly what we would be having for breakfast the next day - sugared ham, fried eggs and garlic fried rice.

As you can see, I didn't grow up eating Cheerios for breakfast or pouring milk out of a carton. I grew up eating rice for breakfast and milk was delivered daily in glass bottles. And it was goat's milk, not cow's milk.


This dish is traditionally eaten for breakfast!


Just coat the ham slices with sugar and pan fry with a little bit of vegetable oil. Cook until both sides are nice and dark (caramelized).

Sinangag (Garlic fried rice) is very simple to make. Day old rice works better than freshly cooked rice. If you don't have day old rice - make sure you cool the rice completely then put it it the fridge for at least an hour. You don't want to make this with sticky rice.


Smash three to five cloves of garlic (leave skin on). Heat up a tablespoon of vegetable oil and start cooking garlic. You don't want to burn the garlic. Add the rice and stir frequently. You want drizzle in oil a teaspoon at a time. I find that doing it this way requires less oil and I don't feel so guilty =). I probably end up using 2 tablespoons of oil in total. I also season the rice with salt, pepper and garlic powder.

As for the egg, just fry up an egg until sides are golden brown.

I guess this combination falls into what some would refer to as "Tosilog". Filipinos love making up words and I think there are about 3 types of "-silog" dishes. The term is made up of the three main ingredients. The first syllable stands for the type of meat. The second syllable "si" stands or sinangag (filipino style garlic fried rice) and the "log" stands for itlog (egg).
The three -silog dishes that I'm familiar with are tapsilog (tapa+sinangag+itlog), tosilog (tocino+sinangag+itlog) and longsilog (longganisa +sinangag+itlog).

Foolproof Pie Dough... I swear!

Hi everybody!! That was a nice 4-day weekend, it's so funny how keeping up this blog has sort of become one of my "day jobs" - only difference is that it's actually nice to be back ;-)


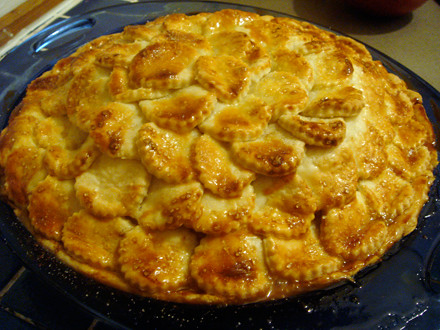
Anyway, you won't believe it but I finally made a perfect, crusty and flaky pie crust!!! I've crowned myself the world's worst pie crust maker in the past, but hopefully that crown will be a thing of the past with this foolproof method I recently discovered.

It all started with an article that I read in the December issue of Cook's Illustrated, which by the way is on the top of my must read magazine list. The article described the science behind pie dough - "The Theory of Pie". They tested and tested until they found a recipe and method that not only baked up tender and flaky every single time but also rolled out easily. Turns out that one of the key steps is to divide the flour into two batches, reserving about 1/2 of the flour for a later step. The first batch would be unified with the butter completely. Then the reserved flour would be added and mixed into the butter and flour mixture until it was evenly distributed. I don't want to get into the science behind it, but it basically has something to do with the balance of gluten (uncoated flour) and fat (butter coated flour). That's why it's so hard to make a consistent crust. If you make the crust using traditional methods, there's no real way to make sure that the ratio doesn't change from batch to batch. It really is a very interesting article and worth picking up.

The final recipe uses Vodka, sounds strange right? Apparently, pie dough gets its structure from gluten, which forms when flour mixes with water. But too much can make it tough, which explains why most recipes require so little water. Cook's Illustrated suggests using vodka, which allows you to add more liquid (so the dough is easier to roll out) but doesn't toughen the crust. Oh and the alcohol vaporizes in the oven!


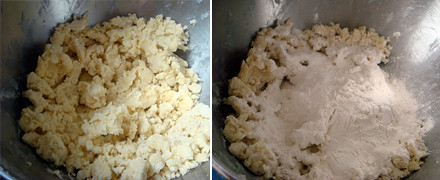
Martha's recipe calls for 2 3/4 cups of flour. So using my pastry cutter and my fingers, I combined 1 3/4 cups of flour with salt, sugar and butter. I like this method, because I didn't have to worry about over-mixing the butter and flour. Once the butter and flour were completely combined, I added the remaining cup of flour.


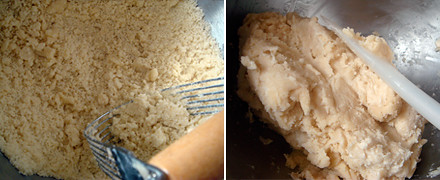
Using a pastry cutter, I quickly mixed in the remaining flour until the texture became sand like. I then folded in cold water with a spatula, one tablespoon at a time, until the dough started to stick. I ended up using 7 tbs.

Unfortunately, I didn't have any Vodka in the house but I still wanted to test out the overall technique of splitting the flour so I went ahead and tried the method using Martha's Pate Brisée recipe. I simply combined 1 and 3/4 cups of flour with the sugar, salt and butter (thoroughly mixed together) then added the remaining flour. I only had to add 7 tbs of cold water and I knew instantly that I had finally done something right. Past attempts didn't have the same doughy consistency that this batch had. My success was even more prevalent once I started to roll the dough out - it wasn't cracking or sticky! It was perfect!!!

Now only if I can get the filling perfect ;-)

Wednesday, November 21, 2007

Anthropologie Gift-Ties


One quick post... I was in Anthropologie today and bought a couple of things (bad!) and look what they're giving away along with their holiday tissue paper and gift boxes - for free!

Isn't this the cutest gift-tie ever??? Why don't I think of these things? It's basically a big puff ball of different yarns/materials like felt, bouclé and then tied up and finished with a cute white button.


OK - talk to you next Monday, I'm taking a couple of days off starting.... NOW.

Thanksgiving Menu

This week is crazy but I love Thanksgiving and I'm really looking forward to cooking a special dinner for a couple of friends.

It would've been nice to see some of the family but it's also nice to spend the holidays with other strays =)

I'll be signing off early today and will be M.I.A until Monday. So an early Happy Thanksgiving to everyone celebrating this week and I'll speak to you next week.


I'm actually going to start prepping for most of the dishes today. Luckily I can also get a head start with dessert, thank goodness for my low-maintenance choice!

So here's what I'll be whipping up for a party of four.

Cocktail: Mulled Wine

Appetizer:
Roasted Chestnuts in Soy Caramel

Main:

:: Baked Brown Sugar Crusted Ham (Hillsy bought the ham from J. Baczynsky's Meat Market)
:: Stuffed Cornish Hens with Gravy
:: Herb sausage and chestnut stuffing - I'll be using this Martha and a Real Simple recipe as guides
:: Roasted asparagus with caramelized shallots wrapped in Prosciutto - inspired by this recipe
:: Giant Cheese Popovers
:: Roasted Sweet Potato Wedges

Dessert:
Milk & Cookies (Buttermilk panna cotta with Chocolate Chunk Cookies)

Songza - Free Online Jukebox

My friend Paolo sent me a link to Songza last night... like Pandora, it's pretty awesome!


Just search for your favorite artist and click play. You can even create a playlist. I noticed that they've incorporated television appearance versions (e.g. Kate Nash on Jools Holland)

Happy listening!

I'm currently reading...


I'm sure you've seen Craft Inc. everywhere, but for what it's worth - it really is a must read for anyone interested in starting their own craft business.

Apples for Jam is a beautiful book. The recipes are organized by color - I can't wait to try them out. I have yet to open the other two - Simple French Food and Jacques Pepin's Complete Techniques...

Tuesday, November 20, 2007

Tutorial: Handmade Pom Pom Christmas Tree Ornaments


I finally started making Christmas Tree Ornaments! I couldn't spend the entire day making ornaments so I decided to start with easy pom pom ornaments. It took approximately 30 minutes to finish two.

Hope you find the following useful. If you have any questions, feel free to email me. It's my first tutorial so I'm not sure if it's easy to understand or confusing as heck! I tried taking pictures of every step as close as possible.

You'll need:
:: yarn (5-8 yards for each pom pom)
:: scissors
:: waxed thread or waxed dental floss (1' per pom pom)
:: ribbon/twine (for hanging) or you can use the same yarn if you don't have ribbon (5-6" for each pom pom)
:: patience
:: Christmas music in the background (optional)


step 1. Begin by wrapping yarn around two or three fingers. The more fingers the bigger your pom pom will be and the more yarn you'll need to get the right amount of puffiness. You'll need a minimum of 5 yards, anything less and the pom pom comes out a little sad and bald. The more you make, the more you'll get the hang of it and you'll be able to sense if you have enough yarn wrapped around your fingers.


step 2. Carefully remove the wrapped yarn from your fingers and tie it tightly with dental floss (perpendicular to the side openings). Do this a couple of times and tie a knot each time you wrap it. Make sure you pull tightly each time and tie it as tight as you can! Don't cut the leftover floss just yet - you'll need it in step 3.

Here's another shot of this step:


Now that the pom pom is secure, you now need to add whatever you'll be using to hang it. You can use ribbon, twine or just a piece of the same yarn doubled or tripled up.


step 3. I used a 5" piece of ribbon and folded it half. Take both of the end-edges and lay it parallel to the yarn grain. You should still have the floss from step 1 hanging, use this and wrap it around the ribbon and tie a knot. Do this a couple of times until you feel that it's secure enough. I'm sure you can also use some glue, but I didn't bother. These are pretty light so I don't think the ties will slip out (hopefully).


step 4. Cut the yarn all around. You'll notice that it will look a little scraggly and really not much like a pom pom. Don't fear... a couple more steps to go.


step 5. I like to call this step digging for lice - because it's about as tedious as hunting for lice. Use your fingers to separate the fibers of each piece to get the pom pom nice and poofy. If you use bouclé (like my teal yarn), it's much easier - rubbing the yarn in between your fingers usually does the trick. If not, you'll have to pull the fibers apart. I'm sure you can use a fine felt brush if you have one but it really isn't that bad using your fingers.

step 6. Once your pom pom is poufed out. Get all Edward Scissorhands on it and give it a nice trim. Don't get scissor happy though, or you'll end up with a mini pom pom. I suggest giving it a final trim once it's on the tree, because sometimes you end up turning it a certain way (just a thought!)

Here are some additional pics of each step...


Last Night's Dinner #63: Baked Fennel Topped with Parmigiano Reggiano


Three main ingredients, easy to make but (oh) so good!
A perfect side dish for pasta or serve it as an appetizer.

You'll need:
(serves 2)
1 fennel bulb, cut into 1/3" slices (cut bulb horizontally)
1/3 to 1/2 cup Parmigiano-Reggiano, freshly grated
2 tbs olive oil
butter for greasing *optional
salt & pepper to taste

Peheat oven 375F degreees

- Trim fennel and only use the main bulb, reserve about a tsp of frawns (chopped).
- Grease the glass or enamel baking dish with olive oil or butter. You want the dish large enough so that every piece of fennel touches the bottom of the pan.
- Lay out the slices on the dish and season with salt and pepper. Drizzle with olive oil. Top with shredded cheese. Cook for about 45-50 minutes.

Some people like to add garlic, I'm sure that can't hurt but I didn't add any to mine. You might also want to add additional cheese at the very end. Have a peek at the 30 minute mark and see if it could use more cheese.

Sprinkle frawns on top before serving.

Monday, November 19, 2007

Mulled Wine... a perfect holiday drink


I wanted to kick off Thanksgiving dinner with a cocktail - something that our guests can sip on while we finish things up in the kitchen and also help set the mood. But I also didn't want to add more work and choose one that would require stirring and shaking!


Here's a really easy recipe for Mulled Wine - just put all of the ingredients in a large pot and heat up.

You'll need:
a bottle of a red wine (the fruitier and berrier the better!)
2/3 cup of sugar or honey (I use both)
10 cloves
1 star anise
3-4 cinnamon sticks
a pinch or two of ground nutmeg
a couple of slices of fresh ginger
1 apple, sliced
1 orange**
1 lemon, zested and sliced into rounds
1/4 c brandy *optional

**Slice a couple of super thin orange slices for garnish before zesting the orange.

If you have the time, I suggest mixing all of the ingredients above in a pitcher or in a large pot and allow it to marinate for a couple of hours - as if you were making Sangria. Then simply heat up once your guests arrive. Make sure it doesn't come to a full boil - you don't want ALL of the alcohol to evaporate. It will be nice and warm and it'll give off a nice holiday aroma.

Serve in mugs or in clear glasses and garnish with orange slices and a cinnamon stick.

Last Night's Dinner #62: Giant Cheese Popovers

The Brit unwillingly bows down to the French...

Look at what sous chef Hillsy baked last night!


Giant Cheese Popovers

We were uncertain about a couple of recipes so we decided to test some out this weekend in preparation for Thanksgiving.

I saw Chef Laurent Tourondel (owner of BLT, where these are served) whipping these up on Martha and wanted to add them to my Thanksgiving menu. I wasn't sure how Hillsy would feel about them, since he usually makes Yorkshire Pudding (pretty much the same thing minus the cheese). I managed to twist his arm to give the recipe a shot - fortunately no arm twisting was necessary when it came to eating them and he managed to inhale 5 of these babies. It was hard for him to admit, but he was very, very impressed with the recipe.


I would have to agree. My favorite part is the crusty crunchy cheese crust.
I'd love to play around with the recipe and maybe try parmesan cheese with a bit of rosemary.

Friday, November 16, 2007

Felt ornament tutorials

I still haven't had a chance to make Christmas Tree ornaments like the ones I posted from Anthro.


But I did find a tutorial by Sunshine's Creations - she uses cookie cutters to make the shapes.


She also created a flickr group - check it out and get inspired!

Other tutorials:
:: The cutest mitten ornaments at disdressed
:: Martha's mini stockings tutorial
:: 3-D ornaments & tree topper

Egg in a hole

Happy Friday!!


I know I said no more eggs but I woke up starving and the eggs just looked so tempting...


Butter both sides. Cut hole. Add toast to pan and crack egg in the hole. Salt. Pepper. Turn. EAT =)

Have a nice weekend!!