Showing posts with label how to. Show all posts

Thursday, July 29, 2010

DIY: IKEA Mirror Revamp

DIY: IKEA mirror revamp

I'm not 100% sure whether or not I like the final result of this project. I've decided to keep it up for a little bit and see how I feel about it after the weekend. I was just so sick of my cheapo IKEA Kolja mirror - it looked so dull and out of place that it was either a) toss it or b) do something to it. So this was my second attempt at B. I first tried framing it with fairy lights but the white Christmas tree lights I had were way too long and bulkier than what I had in mind.

I basically took doilies, folded them in half and double-sided taped them all around the mirror (tucking in the back half behind the mirror). I guess we'll see if this makes the cut!

Thursday, July 15, 2010

How To: Fabric & Marker Painted Decals

diydecals_lifeflix

Hi again! Please go and check out my DIY: Decals guest post on Kelly's awesome blog Make Grow Gather. Thanks for asking me to be a part of your Lazy Summer: Summercraft series Kelly!

Friday, June 25, 2010

How To: Hanging Twig Mobile

Emma's mobile

Here's my latest project for Emma's room - a hanging twig mobile! I haven't quite figured out its final destination (over the crib, the mirror... nursing station...) but it's finally done!

mobile details

You'll need:
One or two dried-out branches
White paint - I used craft acrylic paint
Paint brush
Twine
Glue gun or other strong fast adhesive glue
Various trims
Clear nylon wire/fishing wire
Ceiling hooks

how to: hanging mobile

Steps:
1. Gather branches & paint
2. Glue Gun branches in desired position (if using more than one)
3. Tie branches with twine for added security
4. Paint twine white or leave natural

Note: If you're using only one branch, the balance thing won't be as much of an issue.

It might be a good idea to attach the fishing wire to the mobile at this point so you can get a feel for the way it will fall/hang - which will determine where you will be attaching the decorative elements. Securely tie/knot fishing/clear nylon wire at both ends of your mobile (I attached mine to the two ends where the two branches meet). Figure out how high or low you want the mobile to fall from the ceiling and cut your wire accordingly.

Gather trims and temporary attach them to the base (branch). This is the fun part, there’s no right and wrong, just put them wherever you think looks good! Most trims (vintage leaves and foliage) have paper covered wire stems which will allow you to wrap them into place. You’ll eventually glue gun them in place, but I would wait until the mobile is permanently suspended in its final position. Why? You may need to adjust the position of your trims depending on the way the mobile will naturally balance itself out - so save yourself the aggravation/time and wait to permanently attach the details. You’ll need a step-stool or a ladder and potentially an extension cord for the glue gun if you’re hanging it high up.

Attaching to ceiling: You’ll need to screw in tiny ceiling hooks to the ceiling, so you can attach the other ends of the wire.

Great resources for trims: Papier Valise, Blümchen, if you're lucky enough to be near Parcel (it's a perfect place to find most of the ones I used!)

Thursday, May 20, 2010

How To: Fabric Stuffed Strawberries

I've been saving my Bonne Maman jam jars for the longest time - knowing (hoping) that one day they'll come in handy. The day has come! I was over at Ez's blog Creature Comforts the other day and spotted a glass jar full of beautiful fabric strawberry sachets. As much as I LOVE the chez sucre chez sachets, I've been spending waaaay too much money on the nursery... so I decided to try and make my own. Plus, my stomach has been giving me issues so I've been taking it easy this week and definitely had some major down time.

fabric strawberries

fabric strawberries detail

I found some helpful tutorials (bread and buttons, Moda Bake Shop and Embroideroo) to help get me started and learn the basic steps. I was too lazy to bust out the sewing machine so I hand-sewed everything. I also used four different sizes of fabric (approx 6", 4" and 2" circles before cutting in half).

Monday, May 17, 2010

How To: Faux Sheepskin Cloud Rug

DIY faux sheepskin rug

I featured a bunch of cute ZARA baby products a while ago and a nice reader left a comment linking to this really cool DIY Sheepskin Rug post. I was inspired to give it a shot and finally finished my Cloud-shaped Faux Sheepskin Rugs for the nursery this weekend. I purchased a yard of "Grey Shaggy Pile Faux Fur" fabric from this ebay seller (they also have a website). At first I was afraid the fur was too long, more hairy than puffy... but now that I'm done and the rugs are in place, I love the way they look and feel!

Keep in mind that because I painted my floors using paint with an eggshell finish, I didn't need to attach a non-slip backing to my rugs. Depending on what type of floors you have, you may need to add some sort of anti-slip pad or stickers to the bottom. Ikea sells really cheap anti-slip pads.

faux sheepskin rug details

You could make a huge cloud or like me, make a couple. I was able to make two decent sized clouds out of the 1-yard I purchased.

Step 1. Draw your shape on the back-side of the fabric with a permanent marker. If you're using grey fur, I suggest using a grey marker or disappearing ink fabric marker (if not, a pencil will do). Cut out the shape then shake out to remove excess fur/fibers - I suggest doing this outside or else you'll have fur everywhere, including in your mouth :) Stop after a couple of shakes, don't worry if you still see fur flying around. You really just want to shake out the fibers that were loosened-up from cutting.

Step 2 & 3. Generously apply Fray Check (I buy it at Michaels) at the base of the fur (where the fur is attached to the base fabric) all around the rug. Allow to dry wrong-side up or hanging before laying down on the floor.

Have fun!

Wednesday, January 7, 2009

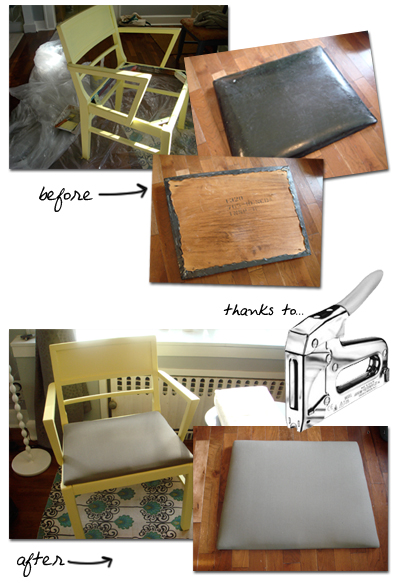
Upholstering: the down and dirty method

As promised, here's a detailed look at how I reupholstered several chairs around the house...


Wednesday, April 23, 2008

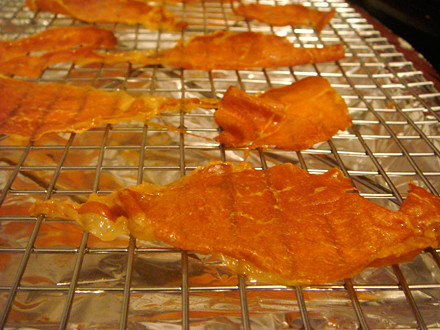
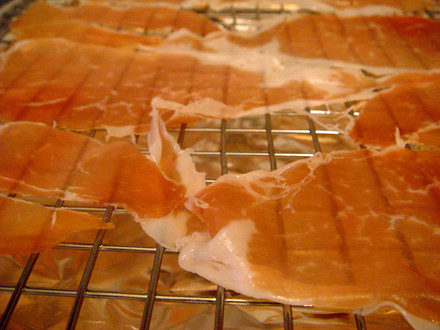
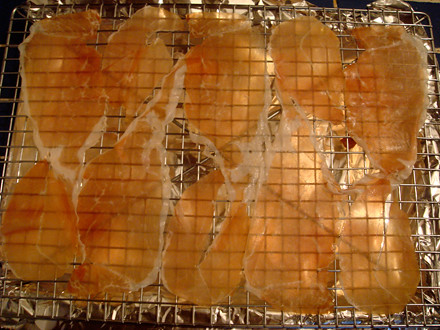
How to: Crispy Prosciutto


Crispy Prosciutto is an easy way to dress up a simple salad or an easy way to put a twist on the BLT classic. I love love love a good crispy prosciutto, arugula and tomato sandwich (garlic mayo a major plus!)

Preheat oven to 450F degrees


Gently place prosciutto slices on a baking/cooling rack, careful not to overlap. Bake until crispy, about 7 minutes. Allow to cool, they crisp up even more.

Thursday, April 17, 2008

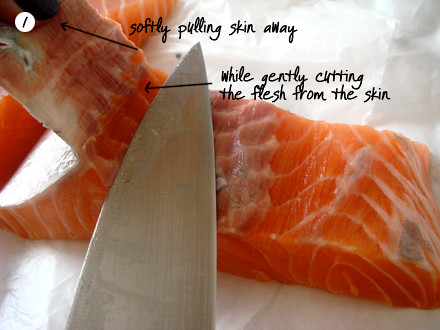
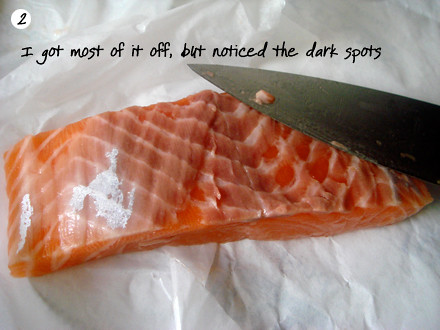
Prepping last night's dinner: Skinning Salmon

I forgot to ask the guy to remove the skin so I reluctantly did it myself. Last night's recipe called for skinless fillets. It sounds silly, but I never skinned fish before. I could imagine other types of fish being harder to deal with since the salmon skin was pretty thick and fatty, which made it easier to remove.

#1 requirement would be a very very very sharp knife!


I don't think the fish guys will be offering me a job anytime soon, but I think I was semi-successful.

Thursday, April 3, 2008

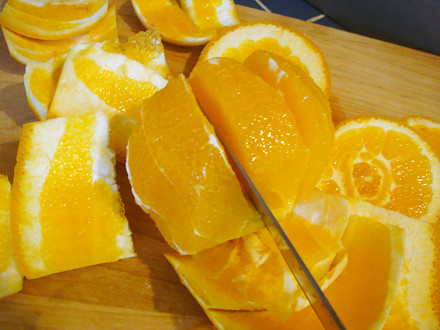
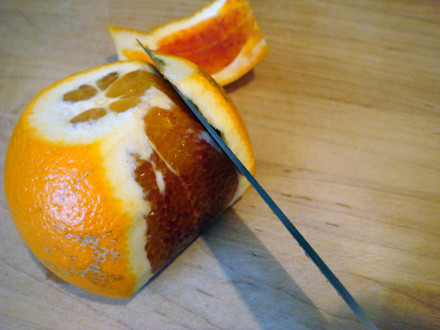
How to cut orange segments (supreme)


supreme [su-PREMM]
v. to remove the skin, pith, membranes, and seeds of a citrus fruit and separate its wedges. Also as noun, a wedge of citrus fruit.

I made an orange and fennel salad last night that required orange slices, so I thought I'd offer a simple how-to on cutting perfect membrane and pith free orange segments (aka Supreme)...


1. Trim the top of the orange


2. Trim the bottom.


3. Carefully take your knife and begin carving around the orange.


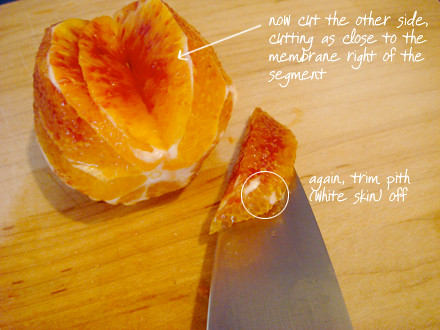
4. Trim as much of the pith (white skin) off. Then find a segment (membrane) and cut to the right of it, cutting as close to it as possible so you don't end up wasting too much of the orange.


5. Now cut the other side of the orange segment. Carefully cutting left of the second membrane.


There you have it! A perfectly sliced orange.

Thursday, December 6, 2007

How to: Get Inspired

I love reading inspiring stories about entrepreneurs. Here are a few links to my favorite sources for both stories and business ideas.


Crafty Synergy is a blog dedicated to interviews with inspiring artists.

Make It is one of my favorite blogs to read. Shannon is the woman behind rifferaff. She creates beautiful silkscreened papers. She just launched her business a couple of months ago and she 's been documenting the entire process, from her frustrations with suppliers to a handful of really useful tips.

Here's a great interview with one of my personal idols Amanda Soule.

New York Magazine's Change your life series walks you through starting your own bakery, wine shop and restaurant, including details on what it really takes.

Entrepreneur
is a great resource for business ideas for those of you who have the bug but haven't quite figured out what type of business to jump into.

ladieswholaunch.com
"Launching is for every woman. Whether you are launching a business, creative hobby, passion or artistic endeavor, Ladies Who Launch gives you the tools, inspiration and network of like-minded, lifestyle-oriented women to make any dream a reality, or take anything you've already launched to new heights."

Thursday, November 29, 2007

How to: Retail Pricing


Here are more articles that I've come across during my research. Great reads on setting up prices in a retail environment.

Pricing and Small Retailers: Questions to Consider (6-Part Series)
"In this article, we begin with several questions for you to consider. When you address these questions for your firm, always ask yourself the rationable behind your answers: 1-Do you have an overall pricing philosophy? What is it? 2-What are the characteristics of the people who shop..." more

Start-up Nation
"Use informal focus groups, testing and even your own experiences as a consumer to figure out what might go through the minds of customers as they consider your prices. There’s a sound psychological reason..." more

The Price is Right, or Is It? Determining the Impact of Price on Sales
"Fisher notes that people tend to separate pricing into markdown pricing and regular pricing. Much of the world’s economy is transacted in markdown pricing; indeed, department stores may sell more than half their volume at..." more

Perception Of Value
"It's a common fallacy that people buy based on price. Well some do, but most people buy based on value or rather their perception of value. Many small business owners begin their business life with the thought that they will enter their market and simply offer what they have at a slightly lower price and all will be good. In truth it's not the best or even a good idea. Unless your last name is Walton and you're an heir to the Wal-Mart throne..." more

Sources:
http://retailindustry.about.com/library/uc/be/uc_be_pricing1.htm
http://www.startupnation.com/articles/1483/1/pricing-strategy-startup.asp
http://knowledge.wharton.upenn.edu/article.cfm?articleid=873
http://www.webpronews.com/blogtalk/2006/12/13/perception-of-value
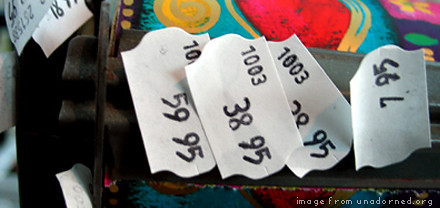
Image from unadorned.org

Wednesday, November 14, 2007

How to: Insulate your Windows for Winter

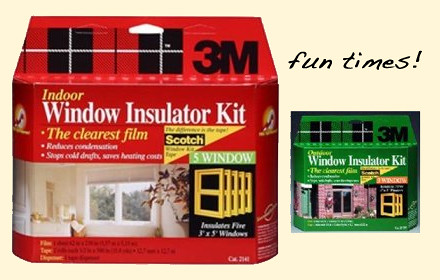
Guess what fun activity we'll be doing this weekend?


... insulating our old drafty windows in an attempt to keep warm this winter. Sometimes, I want to kill my landlord because the boiler in our apartment fails to work every now and then, leaving us with no heat and hot water for the day. Keep in mind, our building was built in 1895 so I don't expect a hi-tech heating system but some warm air kicking in when it's 10F degrees out would be nice. Unfortunately we can't control the thermostat so when it's on it's on and when it's off ... well I'm pretty much in a blanket.

So I've been researching the best (and cheapest) way to insulate windows and found a couple of good resources. You can insulate your windows from both the outside and inside (heck why not do both!).

:: Step by step guide to insulating your windows by diynetwork.com
:: How to build a wooden removable frame to avoid having to shrink-wrap every year

How-to video from curbly.com

Tuesday, November 13, 2007

How to: Price your Craft


I think the majority of folks who make handmade goods sell themselves short, especially in the beginning stages. So how do you price something that you've worked on for a week, poured in 3 days of love and 5 hours worth of sweat?

I'm still trying to figure this all out myself...
Although I haven't found a magic pricing formula, these expert bloggers have certainly helped shed some light on the most important things to consider when coming up with a price...

Posie Gets Cozy - Wholesale, Retail, and Beginning to Sell Your Handmades to Shops, Part I
Posie Gets Copy - Wholesale, Retail, and Beginning to Sell Your Handmades to Shops, Part II
U-handbag - Pricing your Bag

Tuesday, November 6, 2007

How to: Statistics for the Business Plan


Completing the business plan is the biggest hurdle for most people who want to start a business. I hope I'm not alone, but it is truly one of the most daunting documents that I've ever had to work on - I'm still not done with mine. There's just something about writing a document where you need to project sales without having specific historical data, how am I supposed to know how many times Mary is going to go shopping in my shop? AND if it's not supposed to be a perfect projection then why do it in the first place? I know, I know - it's proof of concept and a necessary evil - but still!

So as you prepare to peer into the crystal ball, here are a couple of links to help with statistical data that you'll need for both demographics (target market) and for specific industry analysis.

shop.org (US internet usage, online shopper stats)
census.gov (demographics and industry stats, zip code-specific data available)
United States Department of Labor (average wage statistics - can be helpful when determining target market numbers)

Thursday, November 1, 2007

How to: Naming a business

I've been meaning to share all of my opening a shop research and links but I just haven't gotten around to it. It will be a slow process but one day I hope to transform all one billion bookmarks into useful posts! After all, this can't be my blog if it only talks about one thing!


I can't even begin to tell you how long my list is for potential store names AND I'm still adding to it every now and then. How do you decide on a name? I guess it's like naming a baby (just like how deciding to go into business is like deciding you want to have kids). Why is it such a hard task? I guess it's because the name you choose is the ultimate first impression. It really is the foundation of your brand identity. Does it sound exotic, fresh, young, or frou-frou? The name of your business is probably the first thing that a consumer will interact with, even before they step foot into your store or log onto your website - hearing the name already conjures up images and ideas. Being a consumer yourself, you know how quickly you form opinions based on a smell, a look, a color and yes... a name. Jane v. Cassandra - what images popped into your head?

I found a very useful article Naming your company Be smart and creative: Pick the right name and trademark it by Alex Frankel about naming your business and some key how-to points. Go check it out when you have some time.

I'm in no means an expert on this stuff, but here are a few tips and links that I've encountered - I hope you'll find it useful. If you have any corrections, suggestions or tips of your own - feel free to leave a comment. As I said, I'm definitely not a guru so I will certainly not be offended if my facts stand to be corrected!

1. Create a list. List out your company's core values and differentiating factors. Refer to this list as often as possible. Know exactly what you want the name to say to your consumers. This will help narrow down the possibilities even more. For instance, if you're specifically targeting males in their 30s, a gift shop named LAVENDAR & SAGE would probably not be a good idea. This seems quite obvious but my point is to keep the core objectives in mind, sometimes you fall in love with the way something sounds but it doesn't really serve your original purpose!

2. Keep a running list. I keep a soft notebook in my bag at all times, where the last couple of pages are reserved for potential names. I also created a Google Doc so I could access my list from any computer. It's better than having a word or excel doc stuck on your computer and forgetting to add something you jotted down on a post it note while you were having coffee at the café, that's now shredded into bits because you left it in your jeans pocket and your super nice boyfriend decided to surprise you by doing the laundry!

3. Unfortunately, we now also have to worry about URLs. Forget about scoring an exact match of the name that took you 6 months to come up with - every single possible word or phrase seems to be taken. So save yourself from a huge disappointment and make sure you take this into account early on in the process. Register.com or WHOIS Search (Network Solutions) are both good sources.

4. New York State Corporation and Business Identity database includes business and not for profit corporations, limited partnerships, limited liability companies and limited liability partnerships, as well as other miscellaneous businesses. All other entities such as general partnerships, sole proprietorships and limited liability partnerships file an assumed name certificate directly with the county clerk in each county in which the entity conducts or transacts business.

Check the DBA (doing business as) or FBN (fictitious business name) list in your local county to see whether or not someone else is using the name. I'm not 100% sure but I'm pretty sure all banks require you to file a DBA before you can open a separate account. Unfortunately I don't think there's an online DBA database available. You can file a DBA at your local county clerk (NYS County Clerks), where they will also check to see if the name is already taken. See how to register your business in New York City for details.

Other useful links:
What's in a name?
State government websites
NYC license & permits
New York Loves Small Biz
Babynames.com - I found this useful because it included origin information
Online Permit Assistance

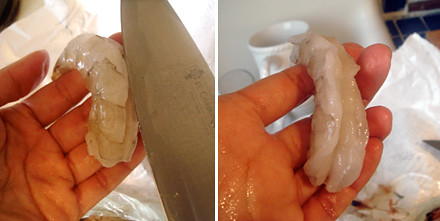
How to: Clean Shrimp


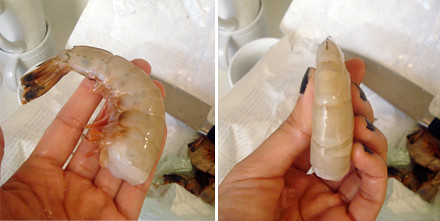
step 1: First you want to remove the shell.


step 2: Carefully slit the "spine". Don't cut too deep, you just want a tiny opening. If you're lucky, it' will be clean like this.


step 3: Most likely it will look like this. This is the digestive tract. You want to run this under running cold water and ease it off with your fingers until completely clean.

Monday, September 10, 2007

How to... make perfect cold brewed iced coffee

Last week Karen asked me how I made my Cold Brewed Iced Coffee. I told her that it was pretty simple, I just used a pitcher and hand filtered the brewed coffee into another pitcher when it was ready.


Yesterday, Karen gave me an advanced birthday present... she said that it would make my life easier.

I'd like to introduce you to my new favorite kitchen equipment...


Thanks Karen!! All I had to do was press and presto! The iced coffee came out perfect!

I used 8.5 rounded tablespoons (Cafe Du Monde French Roast) for 32oz of water (left it in the fridge overnight). Mr. Angel made us 2 extra large glasses of super-strength iced coffee. I think it's the final press that gives it that extra ooomph of bean-goodness. I handed Hillsy his glass this morning and (no joke) 3 seconds later I heard the straw slurping air/ice. Hooverific =)

Next I'll be trying Maxwell House - Ms. Karen swears by it!

Friday, July 27, 2007

How to pack a suitcase

one last one for the road...


I've been trying to perfect my packing skills for the past 5 years. I've become very obsessed with packing. My editing skills when deciding what makes it in the case or not would put Anna Wintour on liquid meth to shame.

There's nothing I hate more than packing clothes, shoes, and toiletries that I don't end up using on a trip. Deep inside, I revel in the 3oz liquid maximum and quart size ziplock rule. I think this obsession is also fueled by other factors: a fear of losing luggage, or the annoyance of having to wait for a suitcase on the conveyor belt (mine never comes out first) and ending up at the very end of the three-mile-long taxi line at JFK after traveling 6 hours with my knees stuck in my ovaries. I'm 5'3 so that's obviously an exaggeration.

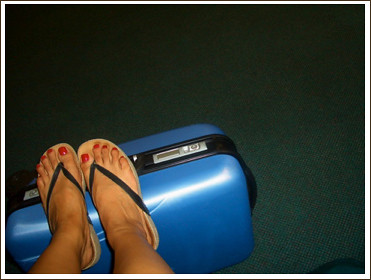
Here are some packing pointers. Follow each rule and never worry about having to check-in luggage again!

  1. Roll everything
  2. Save underwear for last. You can use them to fill-in holes and gaps.
  3. Have a plan. Know exactly what you'll be wearing for the week. Only pack complete outfits. I'll be there for 8 days so I've planned 7 outfits (I wear the same outfit that I arrived in back). It's essential to try on every single outfit before-hand so you know that you're 100% happy with the way it looks & feel
  4. How do I plan the outfits? I start with the base element like my favorite pair of jeans, a dress and a skirt. All 7 outfits revolve around these 3 pieces and they each have multiple pairings. So the idea is not to have 7 bottoms and 7 tops. You need to pick pieces that can work with each other. I also allow myself to bring 2 cardigans just in case the weather cools down. I also pick pieces that are made out of light fabric so I can handwash if necessary.


  5. I'm also bringing one workout outfit. Fortunately for me, my feet don't stink. So I'm able to fit both the socks and the tanktop inside my sneakers. I plan to handwash after each use.
  6. I'm not bringing extra shoes, all my outfits work with the shoes that I'll be wearing on the plane.
  7. Toiletries are all in very small pots and tubes. Liquids in a quart size ziploc and the rest are randomly placed in my case, filling in gaps like the underwear.
I'll let you know how I did when I get back! Pack less and have room for rare finds!